Kitchen Measurements Survey Complete Guide
LET'S START
Before creating your kitchen Quote you'll only need to things: the width of your wall and the position of the water and drainage pipes. Everything else can be verified later on. However please make sure that before the purchase you:
1. Survey the Width of the Kitchen Wall
2. Verify the Exact Position of the Fittings
3. Verify the Ceiling Height
4. Verify the position of the Tiles
5. Verify if your walls have a 90° angle or not
6. Verify if something obstruct or protrude from the wall
WHEN TO PROCEED WITH THE MEASUREMENTS SURVEY
The measurements survey of a kitchen can be made during the construction works (or renovation) but also once all the works have been finished. During the construction works is the ideal time to make a first survey because in this way you will be able to change some details which will result incompatible with the solution you wish to obtain. In this first step you will be able to design fittings and coverings perfectly compatible with your new kitchen: instead of adapting your choices to pre-existing fittings you can create the ideal space for your kitchen. Our Fixtures and Tiles Guide provides all the required information.
The best moment to proceed with the final survey is once the construction works are completed: plumbing pipes and electrical fittings have been installed, floors and tiles are in place as well as doors and windows... at this point you'll have all the necessary information to proceed with your choice. If you need to make your choice before the conclusion of the works, the preliminary survey necessary turns out to be your "final survey": in this case proceed with the survey when at least the plaster has been applied and carefully consider the position of the tiles (tiles have a thickness of around 12 millimetres, the measurement varies according to the type of tile and how they have been installed) as well as any other element that will be added to the room (windows, doors, radiators, electrical sockets...).
NECESSARY TOOLS
There are different measuring tools with different degrees of precision. Measuring rods and laser distance measurers are professional tools that allows you to obtain precise measurements without the help of a second person.
We don't recommend yardsticks since they have a very limited use; laser distance measurers have some measuring limits in some vertical distances or in dimensions which are less than a metre however they offer several pros as they are quick, precise, affordable (you can purchase some models for a relative cheap price) and useful in many situations.
Self-retracting tape measures and yardsticks are everyday use tools, easy to get and cheap: self-retracting tape measures are perfect for the assembling steps and for less than a metre dimensions, they are not recommended for walls measuring since you will need the collaboration of a second person to achieve a satisfactory precision; yardsticks are quite useful to measure the kitchen environment.
We advise against soft tailor's tapes: large retailers usually give complementary soft tapes to customers but those result absolutely not suitable for measuring home environments since they are not precise enough.
HOW TO PROCEED WITH THE SURVEY
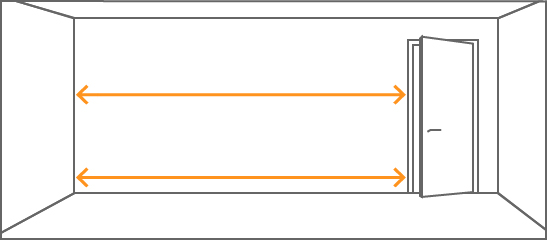
1 - MEASURE THE WIDTH OF THE KITCHEN WALL
Measuring rods and laser distance measurers are easier to use, however self-retracting tapes and yardsticks work well too, just pay a bit more attention. Please remind that walls are never perfectly straight vertically: it is important to measure the widths at different heights, in this way you can mark possible differences. For example, if the measurement at floor height is cm 303 and at a 160 cm height it measures cm 300, we need to note both measurements while keeping in mind that the maximum dimension available for the kitchen is the smaller one (cm 300). In this first step survey also the adjacent walls and draw a plan of the space at disposal: you can use our Measurements Grid which uses a 1:20 scale where 5 cm are equal to 100 cm in reality.
2 - VERIFY THE POSITION OF THE PIPES AND DRAINAGE
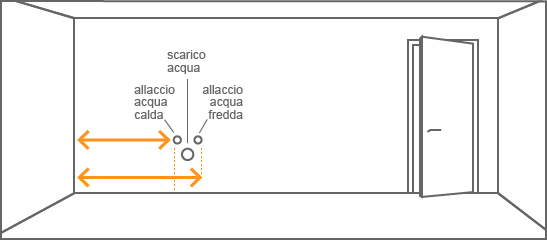
In order to carefully verify the position of the pipes and drainage it is important to start from the width of the kitchen wall. You can measure starting from one of the two extremities. Just to be sure of the result we suggest to measure the distance of each element from both the extremities: if by adding up the two data you will get overall width of the wall it means that the measurement is correct.
The elements to survey are water pipes, gas pipes, electrical sockets and the fume evacuation set up. It is important to mark the position of the different pipes and outlets as a range (for example: from 120 to 135 cm from the left side of the wall) and survey the height from the floor. We recommend to download the Measurements Grid.
3 - VERIFY THE CEILING HEIGHT
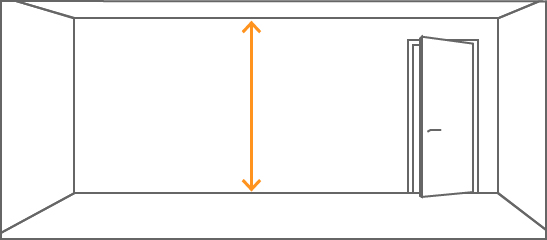
Usually you only need to proceed with one single measurement, especially in case of new buildings, in the UK the minimum required high is cm 240. Our kitchens are available with a height of 216 and 240, with an optional frame of h.7 cm in Dori model: the survey is extremely simple.
On the other hand it is necessary to verify the height in different points in case of a sloping ceiling: obviously the minimum height (which is the most important), but also the maximum one. If the ceiling is characterised by exposed beams it is necessary to survey their position compared to the corners and verify that the measurement "under the beam" corresponds to the "minimum measurement".
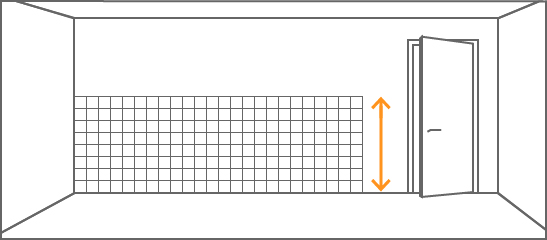
4 - VERIFY THE POSITION OF THE TILES
If the tiles completely cover the wall you'll only need to measure their height. You will need some additional measurements in case the tiles do not cover the wall entirely: nevertheless they are very simple operations and you'll only need to use the Measurements Grid.
If you're doing the final measurements survey before placing the tiles please remind that the tiles will have a thickness of around 10-12 mm, this measurement varies according to the tipe of tile and how they have been installed: this information is very important if you wish to install tiles on the side walls as well. In our Fixtures and Tiles Guide you will find all the information you'll need to verify the compatibility of the tiles with your kitchen or to help you plan the installation.
5 - VERIFY IF YOUR WALLS HAVE A 90° ANGLE OR NOT
If you want to compose a corner kitchen or if a side wall will be adjacent to the kitchen, it is important to verify that the angle is 90°. In order to measure corners there is a professional instrument called Angle meter, however the purchase of this instrument is not strictly necessary and you can use a method called "diagonal method" which is quite precise.
The method of verifying the diagonal consists in measuring on each of the two walls a distance of 60 cm from the corner, write the measured distance on both walls and then measure the diagonal that joins the two points: if the diagonal is cm 84,9 then the angle between the two walls is 90° and it is the ideal situation (please while measuring the diagonal on the floor make sure that you don't have a skirting board yet, otherwise please survey two points above the skirting board, both at the same height).
If you want to see how to correctly survey this measurements you can have a look at an example of the Diagonal Method. The chart at the bottom indicates for the different diagonals the corresponding angle corner dimension: to each dimension you can find the gap compared to a perfectly 90° wall.
In case of linear kitchens, an obtuse angle bigger than 90° creates a space between the side wall and the cabinet front, this space of course is reduced the closer we get to the angle. The space does not create issues from the technical point of view and for your cleaning procedures since it is accessible from the front. With a gap up to 2 cm it is possible to compensate it with a lateral backsplash: from the front the opening remains pleasant but still visible.
In case of an acute angle lower than 90° creates a void next to the cabinet without a frontal access. In this case up to 2 cm of gap it is possible / necessary to compensate it with a side backsplash, obtaining a perfect frontal alignment.
In case of a gap bigger than 2 cm this void can not be compensated and it will result not pleasant from the aesthetic point of you but also definitely less practical as the dirt can fall down: in this case we recommend to avoid close-fitting compositions.
In case of corner kitchens the angle must be 90° (with a tolerance starting from a minimum of 89,5 to a maximum of 90,5°) to be able to properly assemble the kitchen.
6 - VERIFY IF SOMETHING OBSTRUCT OR PROTRUDE FROM THE WALL
Columns, pillars or other protruding structure are all elements you will need to consider.
By surveying the measurements close to doors and windows it is important to calculate possible jambs if not installed yet, pocket sliding doors (on walls where a pocket sliding door is present it is not possible to apply brackets for the wall fastening of cabinets or shelves), radiators or window sills.
In case you want to include pull-out elements (oven, wall units with drop down door or drawers and baskets) next to a wall it is important to verify that nothing will obstruct the opening: door or window jambs; an acute angle; an irregular wall.
It is also important to verify that the washing machine position does not correspond to electrical sockets and pipes: the appliance will be completely adherent to the wall thus it has to be completely free.
Wooden skirting boards are very flexible since they can be easily removed. The ones made of ceramic are easy to handle since they have a height which is usually less than 10 cm: the rear skirting board does not touch any element of the kitchen whereas the lateral one can be managed creating a simple recess in the plinth. Ceramic skirting boards higher than 10 cm are an "obstacle" and will reduce the available measurement according to its thickness.
You also need to take into account boilers and their compatibility with the kitchen cabinets: d.36,5 boiler cabinets are compatible with boilers coming with a depth of cm 33 or less (already fastened to the wall). For deeper boilers it is necessary to choose custom cut cabinets: for example for a boiler that, fastened to the wall, has a depth of cm 40 we recommend to purchase a d.43,5 boiler cabinet (boiler cm 40 + 1 cm of free space + cm 2,5 door). Furthermore it is important to verify that there is nothing preventing to fasten the wall units at the correct height: these in fact have to be placed at a distance of cm 144 from the floor (for a total height of 216 cm with h.72 wall units or h.240 with a cabinet of h.96) in this way the hood is placed at a reasonable distance from the hob.

